Part One : The Basics
Beyblade Burst is the third generation of Beyblade. Created in 2015 by Hiro Morita, this third Beyblade saga came with a whole new universe, characters, and beys. Reading the manga and watching the anime is a part of what makes Beyblade Burst so special as a game, since a lot of beys characteristics or game mechanics are explained by the characters as the story goes on.
When it comes to the game itself, Beyblade Burst introduced a new mechanic : the beys now have a “Burst” system, meaning that any bey from this generation can explode after a significant impact, with its different parts being scattered around the arena.
It’s also fair to say that this generation puts an emphasis on style, aesthetics and gimmicks. Gimmicks are one of the reasons why kids can love Beyblade : if a bey has a special move or a unique characteristic in the manga/anime, Takara Tomy will replicate it in real life. For example, if a bey has an energy barrier in the anime, the toy will have rubber parts that extend under the effect of centrifugal force, creating the illusion that there’s indeed a barrier surrounding the bey. To be honest, some gimmicks are like key attributes, while some others don’t have much of an impact on the game.
It’s also worth noting that all the parts from the Takara Tomy toys are identical to those seen in the show, and their attention to details is absolutely stunning.
Overall, Beyblade is fairly easy to play, but it also has depth, which is why it’s easy to be confused when beginning, or simply missing out on nice features the game has to offer.
Our website is designed to help you start your journey in Beyblade : this page will give you access to everything you need to know to begin and improve your skills. Then, our Wiki will give you an overall description and analysis of every Beyblade Burst tops and their components with two things in mind :
- If you play with your friends and/or your family, we’ll give you tips so you can keep your beys balanced in terms of performance level. This will help you keep the game fun ; if one of your beys is overpowered, it will win every time and ruin the game. You may be a young player, or an adult playing with kids who want to play with the anime’s tops. Right out of the box, some are pretty powerful while some others will struggle to win a single round. Our articles will help you to identify which parts can make the difference without changing the layer (the top’s upper part) and the unique behavior of the anime’s top.
- Tips on competitive parts : if you search for a specific bey or component on our Wiki pages, we will tell you which parts can be competitive if you plan on joining tournaments.
Beyblade Burst : The Rules
In the basic, non-competitive rules, the first player to score 3 points will be the winner. There are three ways to score :
Survivor finish : if your opponent’s bey stops spinning before yours, it’s a survivor finish and you score 1 point.
Ring out finish : if you knock your opponent’s bey in one of the stadium’s pockets, or out of the arena, it’s a Ring out (or K.O.) and you score 1 point. If you knock your bey out of the arena without making contact with your opponent’s top, then it’s a Self K.O.
Burst Finish : If you manage to burst your opponent’s bey it’s a burst finish, and you score 2 points.
If you and your opponent stop spinning at the same time, get K.O.’d at the same time, or burst at the same time, it’s a tie and no points are allowed. If you and your opponent have 3 ties in a row (usually because both tops will stop spinning at the same time), you can decide to call the game a draw, or you can also keep playing until one of the players score and declare him the winner.
The most important thing is to have fun and to keep the game fun, so do not hesitate to bend the rules to your liking. You can change the points required to win, making the battles shorter or longer. If you play in the large Takara Tomy stadium (the Beystadium DB Standard Type), you may find that K.O.’s are harder to achieve since there are only two pockets in this stadium ; then you can decide to allow 2 points for a K.O. (Ring out), it’s up to you and the people you’re playing with.
If you plan on joining a tournament, please note that the rules will change depending on the league or the organizer. Also, you may be required to have 3 or up to 5 different beys, each bey having different components.
The Beyblade Burst Components
A bey is made of 3 main parts : a layer, a forge disc, and a performance tip (usually called driver). As Beyblade Burst evolved, the layer became more complex, having up to 3 different parts starting in the Gatinko/Rise system (Season 4 of the anime) until the end of the Beyblade Burst generation with the Burst Ultimate/Quad Strike system. You’ll be able to see the details of those components in our Wiki pages.
Once all the components of a bey are assembled, we have a combination, or combo. It leads to a fascinating and crucial part of the hobby : customization. While children may need a little help at first, both kids and adults can enjoy this.
The Layer : It’s the upper part of the bey, very important since it’s this component that makes contact with your opponent’s layer. The shape, the weight, the materials of the layer all affect how the bey will perform and behave, how hard it will hit, etc…

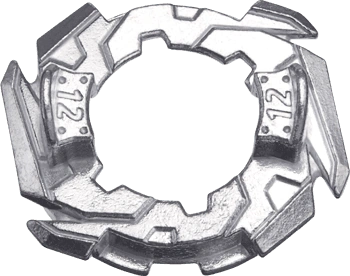
The Forge Disc : This part is made of die-cast metal, and sits right under the layer. When choosing a forge disc to create a combo, a Beyblade player will look at its weight and shape : those will affect the weight, balance and movements of a bey. The forge disc can help a bey to sit in the center of the arena, or on the opposite allowing more movement and aggressive patterns.

The Performance Tip (or Driver) : This part is the base of your bey, sitting right under the forge disc. It affects the behavioral pattern of your bey, since it’s this component that makes contact with the stadium’s floor. The driver also changes the height of a combination. This component is critical when making or modifying a combo.

If you combine the three components pictured above, you’ll get the “Winning Valkyrie 12 Volcanic” combo.
The different types of Beyblade Burst Tops
Attack Type : These tops have agressive shapes and movement, their aim is to burst or K.O. their opponent in a pocket of the stadium. They have less stamina than other types, but are extremely fun to play and watch. Those tops are also the most difficult to use, they require a lot of practice to master : you will need to keep control of the bey’s movement while still launching at a decent strength, and -as we’ll explain later in our Advanced Tips– at the right angle. With practice and experience, your attack beys will deliver big hits to your opponents and become very rewarding to use, creating the most spectacular battles.
Stamina Type : Stamina beys will focus on staying right in the center of the stadium and try to out-spin all their opponents, aiming for a Survivor Finish. They are easy to use, but some may require strength while other may require just a bit of control.
Some stamina beys on the other hand require a weak launch power in order to succeed. We’ll get back to this later since it can be confusing (see “Some Key Concepts” below), but those beys are mainly left spinning, and are designed to “Steal”, “Absorb”, or “Equalize” their opponent’s spin. For example, an adult can launch a right spin bey at full force and still lose against a six-years old launching a “Spin stealing” bey with his hand. The most iconic “absorbing” bey in Beyblade Burst is probably Fafnir.
The weakness of stamina beys is their burst resistance : while they can spin for a very long time, they have poor burst resistance (meaning they are easy to burst) and can be K.O.’d by Attack type tops.
Defense Type : A Defense type bey is designed to cope with the damage inflicted by Attack types. They often move around in circles, so they have a chance to dodge their opponent’s attacks, and they have increased burst resistance (meaning they are harder to burst). Defense beys have average stamina, so they will struggle against Stamina type tops but they can out-spin Attack type beys.
Balance type : This type of bey is harder to describe since they vary quite a bit. Balance type tops do not have any real strengths or weaknesses. In Beyblade Burst, a lot of Balance beys have a dual spin system, meaning you can choose to use them as right spin or left spin, making them a very interesting choice to counter their opponent. In order to make them even more effective as “counter” tops, it’s not uncommon to see different modes on Balance beys ; one part or more will allow you to switch from an “attack” mode to a “defense” or “stamina” mode.
So we have 4 different types of tops, working just like a rock/paper/scissors system :
Attack is stronger than Stamina
Stamina is stronger than Defense
Defense is stronger than Attack
Balance will try to act as a counter to any of the other types, by switching spin direction and mode.
The Beyblade Burst (Sub)Systems
When you begin to make your purchases in Beyblade, we strongly advise you to pick your beys within the same system. The Dynamite Battle and Burst Ultimate systems are very close, you can mix those without any issues. Mixing early models from the Dual Layer or God Layer eras with Dynamite Battle models could damage your beys, and I doubt the games can be thrilling.
Systems can be confusing when you’re completely new to Beyblade. Basically, there are now a total of 7 systems (or subsystems to the Beyblade Burst system).
- Dual Layer : the first “Burst” beys released, they are now very difficult to find
- God Layer : this one is essentially the toy line of the anime’s 2nd season, Beyblade Burst Mugen (Evolution in US and Europe). This system is very interesting because they have a fantastic design, pleasing to the eyes and fun to play. They are pretty small compared to the last systems released, and have a much higher burst rate. So, if you’re looking for great looking beys and lots of burst finishes, then it could be the system for you. These models can be difficult to find.
- Cho-Z Layer : this is the anime’s 3rd season toy line (Beyblade Burst Turbo in US and Europe). Still a very decent amount of burst finishes, and the tops are getting bigger and heavier by the end of this season. Metal is introduced in the layers, resulting in bigger impacts and more spectacular battles.
A few things worth mentioning for kids : they usually are great fans of Valt Aoi, the anime’s main protagonist, proud owner of the Valkyrie Beyblade. The Cho-Z Valkyrie model is in my opinion the strongest, or at least one of the strongest Valkyrie models in the whole Burst generation. Children can be frustrated to see their Valkyrie losing a majority of battles, so this system can be great because it delivers entertaining games with the likes of Cho-Z Achilles and Cho-Z Valkyrie. There is one catch though : the Cho-Z gimmick found on Cho-Z Valkyrie, Cho-Z Achilles and Cho-Z Spriggan (an anti-burst system ; you’ll see it explained in our Wiki pages) is almost impossible to trigger for kids, it simply requires too much strength. If you want your kids to have a chance at triggering the Cho-Z gimmick, get a Power Launcher from the Dynamite Battle/Burst Ultimate era. - Gatinko Layer (players often refer to it simply as GT Layer) : this is the anime’s 4th season toy line (Beyblade Burst Rise in US and Europe). Again, decent amount of burst finishes. This system introduces a new layer, now assembled with 3 interchangeable parts : the blade, the weight, and the core. The blade is the part that makes contact with the opponent, the weight is an added metal part that provides balance and synergy to the combo, the core is the part at the center of the layer, on which you can see the bey’s spirit (Valkyrie, Dragon, Fafnir etc…)
With the layer now being made of three interchangeable parts, more customization options are available : you can heavily modify both performance and appearance of your beys. - Superking Layer : this is the anime’s 5th season toy line (Beyblade Burst Surge in US and Europe). The “Weights” from Gatinko are gone, but this system introduces the Chassis part, making the tops bigger and heavier, and also reducing the burst rate significantly. There are two types of Chassis : Single and Double. With a single chassis, a forged disc is still required and the beys will burst in the usual manner. A double chassis replaces the forge disc, creating a large layer assembled to the driver.
- Dynamite Battle Layer (players often refer to it simply as DB Layer) : this is the anime’s 6th and final season toy line (Beyblade Burst QuadDrive in US and Europe). The Chassis is gone, the metal part from Gatinko comes back with a different shape, and becomes the “Armor”. The forged disc produced in this system are heavier than before. Layers now have two different modes : Low and High. The Low mode has better stamina, but High mode can still be useful in specific battles ; it can help to generate more movement, and can also be used to mitigate “spin-steal” (explained below in our Key concepts part). We would suggest you to try these beys in low mode first.
Also, these beys are so large and heavy that the Takara Tomy standard stadium can feel too small to make interesting battles. Ring Out Finish can still be achieved but even the pockets can seem too small, thus making refereeing more difficult, depending on the rules used. Opinions will differ on that specific topic, but the Takara Tomy Dynamite Battle arena can feel like a breath of fresh air when playing the DB system : the arena is larger and so are the ring out pockets. The gameplay itself is very different from the standard version, different enough to force competitive players out of the usual “meta” (the meta could be described as a shortlist of top components to create the best possible combinations). In spite of the long running debate over those two stadiums, in 2023 it looks like a lot of tournaments are hosted with the DB Stadium. - Burst Ultimate Layer (players often refer to it simply as BU Layer) : This is the last Beyblade Burst subsystem. It is very similar to the DB system, but it features a new “BU Blade”, adding gimmicks to the blade itself. Since this system was released after the anime final season, the models you’ll find are mostly remakes of famous beys that did not appear in season 6. If you are just starting your collection, you can mix the DB and BU systems without any problems.
To conclude, keep in mind that earlier models are getting harder to find, and prices will keep going up. A few things to help you start your collection :
– if you want a higher burst rate and models that are easy to use for kids, aim for the God Layer or the Cho-Z Layer systems.
– If you want more customization options and keep the models relatively easy to use for kids, aim for the Gatinko Layer or the Superking Layer systems
-The Dynamite Battle and Burst Ultimate systems are a very popular choice in tournaments, so those are the ones you want to go for if you’re thinking about joining or organizing tournaments . Note that their price remains stable at the time of writing (2023), and they are pretty easy to find, so the DB/BU systems are clearly the easiest and cheapest to collect. Finally, the gameplay can be slightly more complex with the introduction of the DB Stadium, and young children (I’d say from 6 to 8 years old) may need help to create and assemble their first combos (some parts can be hard to remove and put back in place at times). Very young players may also have a slightly steeper learning curve with those systems because of the weight of the beys, which is approximately twice the weight of a God Layer bey. Kids get used to it though, so do not worry about it.
Part Two : Advanced Tips and Techniques
Before you get into more advanced techniques, we strongly advise you to practice your launch with this in mind : keep your launcher steady. It sounds super easy, but launching with strength without sudden moves on your launcher is pretty difficult. If your kids are playing (Takara Tomy recommends Beyblade Burst to 6 years old and above), then keep an eye on their launch to make sure both you and your children are playing in safe conditions. Kids may want to launch with strength, and they may try do so while being very, very excited to play. If the launcher moves too much, beys can be thrown out of the stadium, so keep that in mind before attempting advanced techniques. A launcher grip can help a lot when it comes to keeping your launcher still.

Some key concepts in Beyblade Burst
Tornado Ridge : It’s the edge of the arena, acting as a barrier. If a beyblade goes too fast it will go over the tornado ridge, hitting the walls or going in a ring-out pocket.
Tornado Stall : a strategy that consists in moving around the stadium in wide circles and embracing the tornado ridge as long as possible. Launch power needs to be controlled to prevent the bey from going over the tornado ridge.
Flower Pattern : It is a movement pattern that keeps your bey moving from the edge of the stadium (the tornado ridge) and back to the center at high velocity to hit your opponent’s top as hard as possible. When a banking shot is executed properly, your spinning top will move in flower shaped pattern, without hitting the walls or the ring out pockets. This movement pattern is used to attack beys that are sitting in the center of the beystadium, such as stamina type models. When creating attack type combinations, players will typically look for components that allow a sustained and aggressive flower pattern : the driver choice is crucial, but do not overlook weight distribution.
Weight Distribution : This is a complex topic, but we’ll try to keep it simple. In Beyblade, you will come across concepts like OWD (Outward Weight Distribution) and CWD (Central Weight Distribution). Usually, players will try to affect weight distribution with the forged disc, which, depending on its shape, will direct the force inside or outside the beyblade. Why does it matter ? Well, in most cases, if you add OWD to your combination, it will have more stamina, or more hitting power (because more force will be directed towards the contact points of the blade). If you add CWD, you will have better defense, because your bey will be a bit harder to push all over the arena. You can also play with weight distribution to put as much weight as possible in one specific point of the bey : this will give great hitting power, but will reduce balance and stamina.
Weight Distribution is important to keep in mind, especially in the DB/BU systems. The synergy you can get by adding weight through the forged disc and the armor is a very interesting part of the game.
Spin Steal : Spin Stealing or Spin Equalizing combinations tend to have rubber covering their contact points, and work when facing a bey that spins in the opposite direction. As mentioned earlier in this article, brute force is useless against such a combo : the spin-stealing bey will gain speed every time it makes contact with its opponent. You’ll find a few tips to help you beat those combos below.
LAD (Life After Death) : It is the ability of a bey to keep spinning after falling over. The shape of the blade used is important : a circle shaped blade will add LAD to your combo. You will also want to look at free-spinning parts, on the blade, disc or driver. Drivers with free-spinning discs or balls will also add LAD to your combination. LAD is very important in stamina battles, it can give you a few extra spins to win a close battle.
Scraping : We will sometimes mention a “scraping risk” when describing a beyblade’s performance in our Wiki pages. It refers to a part of the bey (usually the forged disc or a specific driver’s part) that is literally scraping against the stadium’s floor. This will drain stamina, slow your bey down, cause knock-outs etc… It’s just a bad thing you want to avoid.
Smash Attack : It’s the most common type of attacks used in Beyblade. It just means that the contact points of your attack combination will push the opponent’s bey away, as far and fast as possible.
Upper Attack : Not as common as the smash attack, the upper attack can be achieved with a bey whose contact points are shaped as a slope. When the upper attack connects with enough momentum, it will lift up the opponent’s bey, sending him flying, sometimes over the arena. This is one of the reasons why you want to keep the recommended posture at all times.
Advanced Techniques
What is a Banking Shot and how to perform it ?
This is the technique used with attack type models to create a flower pattern. When playing Beyblade, you just have to keep your bey parallel to the stadium at launch. To execute a banking shot, you need to keep your launcher tilted this way : keep the base of your bey parallel to the angle of the arena. The driver of the bey should be “looking” in your direction, not in your opponent’s direction. It requires practice, but it is mandatory to really appreciate what attack beyblades have to offer. You’ll improve your technique with time, as you will need to slightly adjust the angle depending on the model you are using for optimal results. Looking for the perfect angle while also aiming for the perfect amount of strength during your launch is what makes attack beys more difficult, but also more rewarding to use. If launched too hard, the beyblade will be sent flying in the stadium walls, causing massive stamina loss.
My stamina Beyblade keeps bursting, what can I do ?
Burst resistance is the weakness of stamina combinations, and you may be stuck with a limited number of parts to customize your bey when starting your collection. If upgrading weak parts is not an option, then practice your launch to find the right amount of strength needed for your combo. Launching as hard as possible is very tempting when playing a stamina bey, but it exposes you to a higher burst risk. Some models, especially the earlier ones (Single/Dual layers and God layers) burst very easily if you launch them too hard. Since stamina models are designed to spin for a long time, you may not need to launch them as hard as you think.
To make things worse, here’s another useful thing to keep in mind while playing Beyblade : if one player makes a very weak launch and his opponent makes a super powerful launch, it’s the super powered bey that is going to burst. If your opponent’s bey is barely spinning and you launch yours with speed your beyblade will burst and may even end up being damaged…
Some specific models will burst very easily no matter what you do, because the teeth inside the layer will just be too small. In that case, upgrading your driver with a “dash model” may help. Dash drivers have reinforced springs, thus giving more burst resistance. If you are on the market for a dash driver, just look for a dash after the driver’s name. Example : Destroy has a normal spring mechanism, Destroy‘ has reinforced springs. This upgrade along with a controlled launch may help you to survive more hits.
Tips to beat Spin-Stealing combinations
If you are now able to control your launches power and angle, if you can create flower patterns, then you can play all types of beyblades. Then, Spin-Stealing combinations are probably the next challenge you are going to face. Those models are very tricky to beat, at first glance nothing works against such combinations : hits seem to be absorbed, speed seem to be stolen, launch power feels useless. Well, first of all, let’s not forget the rock/paper/scissors nature of the game ; a good combination may be brilliant against some combos, and useless against others. Sometimes, you will be using beyblades that are just not good against spin stealing opponents.
With that being said, there are things you can try to defeat spin-equalization combos. The first thing you may want to do is to have a weaker launch than your opponent. As mentioned earlier, power is useless because rubber and the friction it provides will always speed up the spin-stealing bey, but depending on the parts you have, things can work the other way around. By launching your bey with less power than your opponent, your beyblade will use the rubber parts of your opponent’s layer to speed up. Again, depending on the specific combo you use, it’s not a guaranteed win, but it can be enough to salvage a streak of ties. In that scenario, LAD (Life After Death) is very useful : if your combination has a bit of LAD, you may turn these ties in wins (by a hair, but a win still).
When playing with the DB/BU system, assembling your combination in high mode can also help, because spin-stealing beys may have a harder time finding grip and friction on your layer (assuming your opponent’s combo is assembled in low mode).
When using an attack type bey, you may have another option : the Tornado Stall. Instead of going for the hits by using a flower pattern, you may want to avoid your opponent by circling around him. Your spin-stealing opponent may try to go for a very light launch to spin-equalize or even burst your beyblade. In that case, if you launch your attack bey with no angle at all, it should go all around the arena, moving in a wide circles pattern, embracing the tornado ridge. This can be risky, since you’ll need to launch your bey hard enough to stay against the tornado ridge as long as possible, but there is still a chance that your opponent’s bey stops spinning before yours goes back to the center of the arena and hits it.
Finally, there are components which are specifically designed to beat opposite spin beys, including spin stealing beys. Some drivers can turn a combo in anti opposite spin bey. When it comes to parts, you can also look for a blade that is very smooth, to limit the friction that spin-stealing combos need to work. The right launch with a very smooth blade can “cancel” your opponent’s attempt to equalize your speed spin, lacking the levels of friction to do so.
How to launch an attack type vs an attack type ?
You don’t necessarily need to commit to the banking shot and the flower pattern when going against another attack bey. In this scenario, there is no shame in going for a simple tornado stall, and chase your opponent down the tornado ridge, leading to one of the beys being knocked out. If both opponents choose to use the banking shot, then both beys will collide in a big impact right at the start of the battle. With heavy models and agressive shapes, this can potentially damage your beyblades and the battle won’t be that interesting (think DB/BU beys in a standard arena). With experience and knowledge of your opponent’s beyblade, you will learn how to adapt your launch depending on the match-up.
How to improve an attack type beyblade performance in the DB stadium ?
As mentioned earlier in this article, the DB stadium affects how the game is played. Typically, attack type combinations, especially the ones that are part of the competitive meta, are using rubber drivers, meaning that the tip of the driver is made of rubber. Rubber has poor stamina, but it provides the most agressive movements. In the DB stadium, my advice would be to go for plastic drivers instead. In this large stadium, even attack type beys need that extra stamina that plastic drivers can give. Do not hesitate to think outside of the box and experiment, you can’t rely on the usual competitive meta alone to have good results in this stadium, this is why it can be really fun.
Sliding Shoot
This technique is an advanced one and it can be tricky to perform, it is also designed for attack type beys. We strongly recommend to master your banking shooting technique before attempting this one. The sliding shoot is performed by keeping your launcher parallel to the stadium’s angle (just like the banking shot), but then you need to push the launcher forward as you pull the string/ripcord. You start your launch with your elbow bent, and you’ll push your launcher forward by straightening your elbow. Practice that technique alone, without anyone in front of you. If performed correctly, your bey will lunge in the arena at high speed and still move in a flower pattern. Do not rush it, depending on the players, it could take weeks or months before you can execute it properly. We strongly recommend to learn this technique through practice before attempting it against an opponent, you want to make sure you can execute it well and with consistency.
Have fun
Our wiki pages will highlight competitive parts, but never forget that the most important thing is to have fun. Restricting yourself to the competitive meta can be great for a while, but you will restrict yourself to the use of a very limited amount of parts. Players who go to tournaments on a regular basis do not necessarily care about the meta that much, a lot them bring original combos designed to create intense battles. They know the meta for sure, but it doesn’t mean they always stick to it. If you are mostly playing with friends and family, use our wiki pages and the resources you can get to have a better knowledge of the different components, and then experiment to keep the game balanced, fair and fun. This is a great part of the hobby, even young children can have fun while creating combinations of their own. With that being said, we hope this article and our website as a whole will help you ease your way into the limitless universe of Beyblade, and we hope you will enjoy this brilliant game. With everything it has to offer, you can share great moments and memories with your friends and family. Have fun !